Keep Your D11 Running: Easy Injector Replacement Tips
Why Proper D11 Injector Replacement Keeps Your Fleet Running
Volvo D11 injector replacement is a critical maintenance procedure for any fleet. When fuel injectors fail, you face decreased power, poor fuel economy, and costly downtime. Understanding the symptoms, tools, and key steps is essential for keeping your diesel engines running efficiently.
Key aspects of a Volvo D11 injector replacement include:
Symptoms: Look for engine misfires, poor fuel economy, excessive smoke, and rough idling.
Procedure: The core steps involve removing the valve cover, extracting the old injector, replacing the injector cup, and installing the new injector.
Critical Steps: You must program new injector trim codes into the ECM and always replace injector cups with new injectors.
Volvo D11 engines are workhorses in the commercial vehicle industry, and their performance hinges on precise fuel injection. Injectors typically last 150,000 to 200,000 miles, but when they fail, the problems multiply. Poor combustion increases emissions, reduces fuel economy, and can damage other engine components, leading to unexpected downtime.
Fortunately, with the right knowledge and quality parts, D11 injector replacement is a manageable task. This guide will help you make informed decisions about handling these crucial repairs.
Understanding the Volvo D11 Fuel Injector System
The Volvo D11 engine uses a sophisticated common rail fuel injection system to deliver fuel at extremely high pressures with split-second timing. Each fuel injector acts as a high-speed valve, turning pressurized fuel into a fine mist for efficient combustion. When this system works correctly, you get the power and fuel efficiency your fleet depends on.
Beyond the injector itself, injector cups and O-rings are critical for maintaining a proper seal. These components prevent coolant and combustion gases from mixing, which could lead to catastrophic engine failure. Understanding the entire system is key to appreciating why quality components are non-negotiable during a Volvo D11 injector replacement.
How D11 Injectors Work
The D11 uses Electronic Unit Injectors (EUI), which are controlled by the Engine Control Module (ECM). The ECM acts as the engine's brain, calculating the precise timing and amount of fuel for each injection event. When the ECM sends a signal, the injector's solenoid valve opens, allowing high-pressure fuel to spray into the cylinder.
This electronic control enables superior atomizationbreaking fuel into microscopic droplets that burn cleanly and completely. The result is optimized engine timing, maximum power, and compliance with strict emissions control standards.
The Critical Role of Injector Cups and Seals
While the injector delivers fuel, the injector sleeve (or cup) and its O-rings prevent disaster by maintaining the cylinder head seal. They create a vital barrier that keeps coolant and combustion gases separate.
A failed injector cup can cause coolant contamination in the fuel system or fuel in the coolant system. Likewise, combustion gas leaks past a failed seal can cause rough running and severe engine damage. That's why experienced technicians insist on replacing injector cups during any injector service. It's a small investment that prevents major repairs.
Diagnosing a Faulty D11 Injector: Symptoms and Causes
Before starting a Volvo D11 injector replacement, a correct diagnosis is crucial, as other issues can mimic injector failure. Your engine will provide several warning signs when an injector is failing.

Telltale Signs of Injector Failure
Engine Misfires: A rough, stuttering idle is a classic symptom.
Poor Fuel Economy & Power Loss: The engine works harder to produce power, consuming more fuel and feeling sluggish.
Exhaust Smoke: White smoke often indicates coolant burning due to a failed injector cup, while black smoke points to unburned fuel from a faulty injector.
Fuel Odor: A strong diesel smell around the engine suggests a fuel leak.
Check Engine Light: The engine's computer will often log a fault code and illuminate the light.
Common Causes of Injector Problems
Fuel Contamination: Dirt, debris, or water in the fuel can damage the injector's precise internal components.
Wear and Tear: Injectors operate under high pressure and eventually wear out, typically after 150,000-200,000 miles.
Electrical Faults: A problem with the injector's solenoid or wiring can prevent it from firing correctly.
Injector Cup Failure: The seals face immense heat and pressure. Modern Ultra-Low Sulfur Diesel (ULSD) has lower lubricity, which can accelerate wear on these components.
Diagnostic Procedures for Your Volvo D11
A systematic approach is best for an accurate diagnosis.
Read Fault Codes: Use diagnostic software to pull codes from the ECM, which often points to a specific cylinder.
Injector Cutout Test: Use a diagnostic tool to disable injectors one by one. If disabling an injector causes no change in engine performance, you've likely found the faulty one.
Visual Inspection: Check for fuel leaks, soot (indicating a combustion leak), or coolant around the injectors.
Coolant System Pressure Test: This can confirm if a failed injector cup is allowing coolant to leak into the cylinder.
Swap Injectors: Move a suspect injector to another cylinder. If the fault code follows the injector, the injector is bad. If the code stays with the cylinder, the issue is likely wiring or the ECM.
The Complete Guide to Volvo D11 Injector Replacement
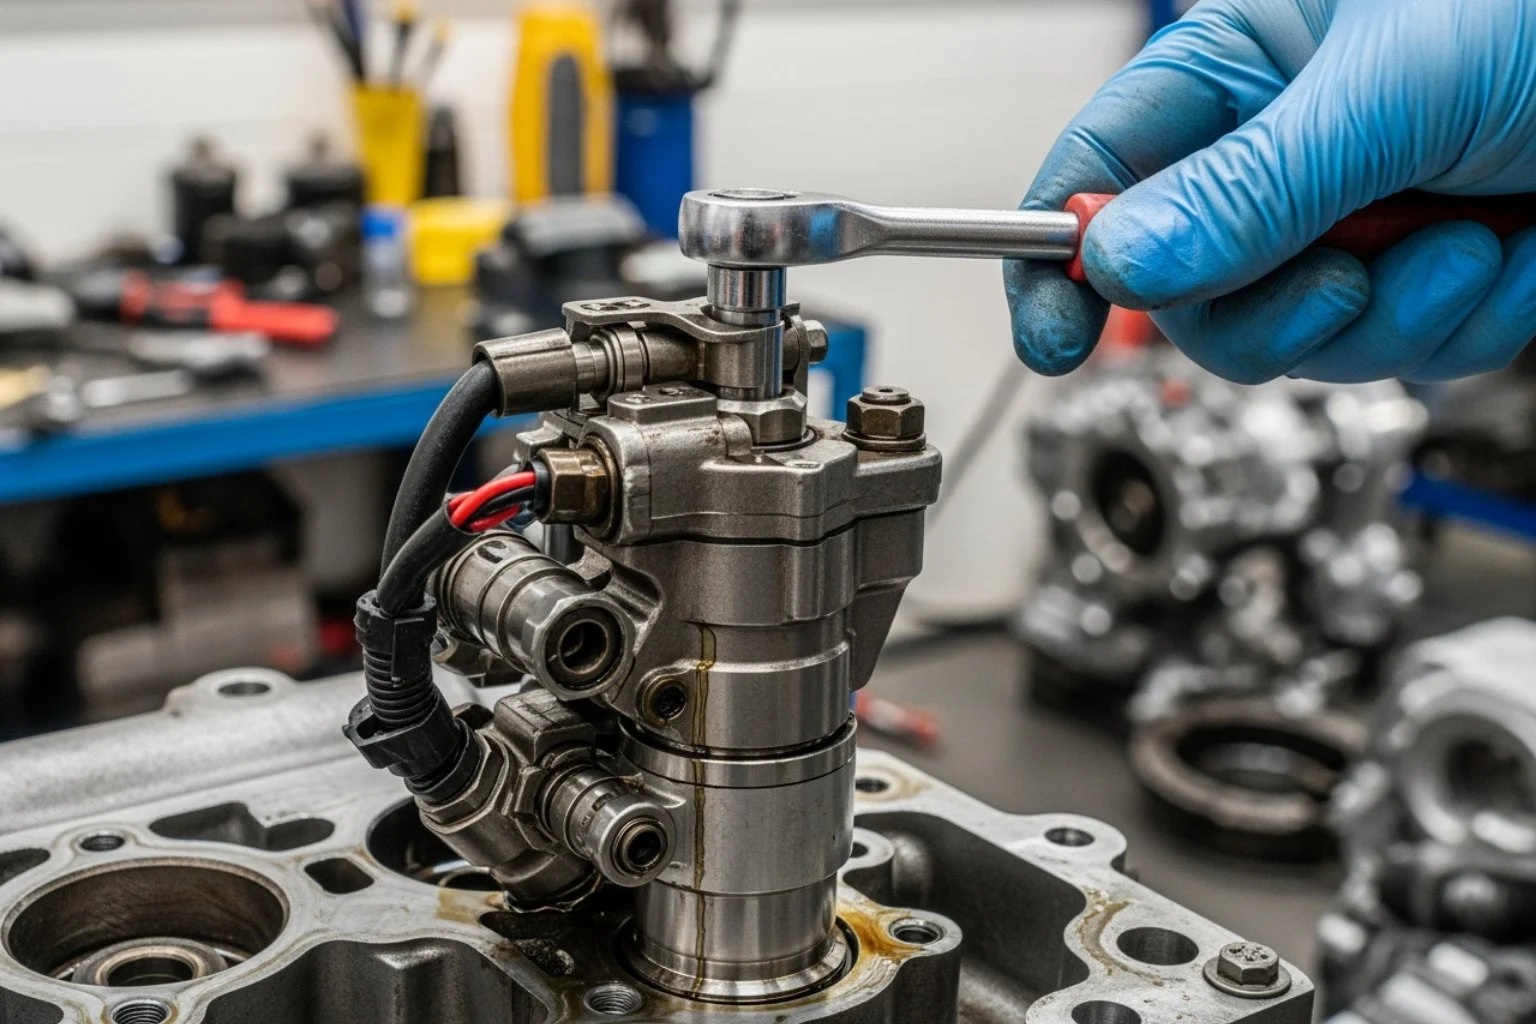
Once you've confirmed a faulty injector, it's time for the replacement. This procedure requires precision and cleanliness to avoid engine damage. Prepare a clean, well-lit workspace before you begin.
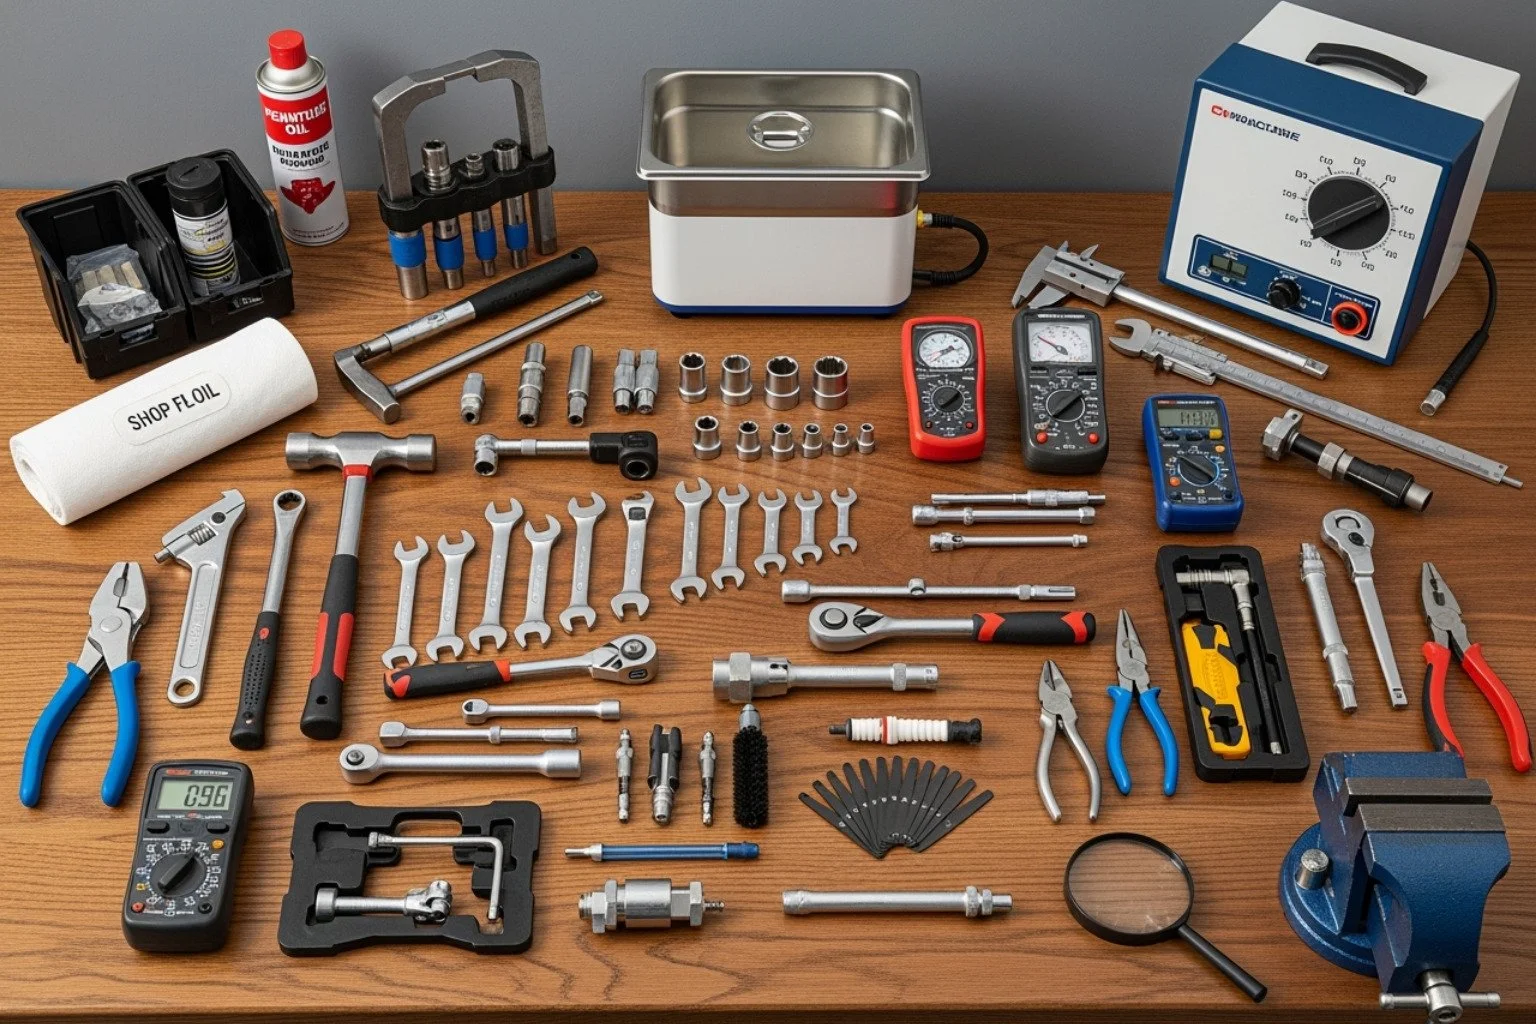
Essential Tools and Parts for the Job
Using the correct specialized tools is non-negotiable for this job. Key items include a slide hammer with an injector puller, a forming tap (8.3 mm) and extractor tool for the sleeve, and a specialized injector sleeve installation tool with a swedging bit (7.9 ± 0.05 mm). You will also need a calibrated torque wrench, cleaning brushes, and a shop vacuum.
For parts, you'll need a new or high-quality remanufactured injector, a new injector sleeve (this is mandatory), new O-rings, graphite sealant paste, and a new valve cover gasket.
Step-by-Step Injector Removal
Safety First: Disconnect all battery cables.
Drain Coolant: Drain the coolant from the radiator and engine block to prevent spills.
Access Injectors: Remove the valve cover and then the rocker arm shaft. Mark all components so they can be returned to their original positions.
Extract Injector: Before removing the injector hold-down bolt, mark the valve bridges and injectors. Attach the slide hammer and puller, using firm, steady pulls to extract the injector. Immediately cover the injector tip and plug the injector bore to prevent contamination.
Replacing the Injector Sleeve (Cup)
This step is mandatory for every Volvo D11 injector replacement. Reusing an old sleeve will lead to failure.
Prepare: Rotate the flywheel to lower the piston in the corresponding cylinder.
Remove Old Sleeve: Use the forming tap with grease to thread the old sleeve. Use the extractor tool to pull the sleeve out.
Clean the Bore: This is a critical step. Thoroughly clean the injector bore with brushes and a vacuum to remove all debris and old sealant.
Install New Sleeve: Apply a thin layer of sealing compound to the new sleeve, lubricate the O-ring, and use the installation tool to seat it. The swedging process, performed with the specialized tool, flares the top of the sleeve to create a perfect, permanent seal.
Installing the New Injector
Prepare Injector: Clean the cap nut seat surface of the new injector with a shop rag and diesel fuel. Do not use abrasives.
Install O-ring: Install the new upper O-ring, lubricated with clean engine oil.
Seat Injector: Lower the injector into the bore. Apply graphite sealant paste to the injector cap nut cone.
Torque Hold-Down Bolt: Follow Volvo's precise five-step torque sequence. This is not a simple torque-to-spec bolt. The bolt can only be reused a maximum of five times; track its usage and replace it when necessary.
Program ECM: Use Volvo Tech Tool or equivalent software to program the new injector's unique trim codes into the ECM. This step is mandatory for proper engine function. Reset learned ECM parameters after programming.
Post-Installation: Final Steps and Key Considerations
With the new injector installed, careful reassembly and final checks are needed to ensure a successful repair. Do not rush these final steps.
Reassembly and System Priming
Reassemble components in reverse order. Install the valve bridges and rocker shaft in their original positions, coating them with fresh engine oil. Adjust the valves and injectors according to Volvo's specifications—this is a critical step for engine performance. Install the valve cover with a new gasket to prevent oil leaks.
Before starting the engine, prime the fuel system using the hand pump until you feel firm resistance. This removes air from the lines that could cause a rough start or no-start condition. Reconnect the battery and start the engine, letting it idle for several minutes while you check for any fuel or coolant leaks.
Choosing the Right Injector: OEM vs. Remanufactured Options
You have a choice between OEM and high-quality remanufactured injectors.
OEM Injectors: These are brand new from the original manufacturer and meet factory specifications, but they often come with a higher price and longer lead times.
High-Quality Remanufactured Injectors: Units from specialists like G2 Diesel Products are completely remanufactured to meet or exceed OEM standards, often incorporating design improvements. They offer significant cost savings, strong warranty coverage, and better availability.
When purchasing remanufactured injectors, be aware of the core charge policy. This is a refundable deposit you get back when you return your old, rebuildable injector core.
Potential Risks and How to Avoid Them
Engine Contamination: The biggest threat. Work cleanly, use plugs, and keep tools spotless.
Cylinder Head Damage: Use the correct puller tools. Never pry or force a stubborn injector or sleeve.
Incorrect Torque: Follow Volvo's multi-step torque sequence exactly. Incorrect torque leads to leaks and component failure.
Hydraulic Lock: Clean oil out of the injector yoke screw holes before tightening the bolts.
ECM Programming Errors: Always program the new injector's trim codes. Skipping this step guarantees poor performance.
Warranty Denial: Failure to follow Volvo's official procedures may result in the denial of warranty claims for related engine damage.
Frequently Asked Questions about Volvo D11 Injector Replacement
Here are answers to some of the most common questions about Volvo D11 injector replacement.
Do I have to replace the injector cup when I replace the injector?
Yes, absolutely. A new injector sleeve (cup) must be installed with every new injector. The old sleeve has been subjected to intense heat and pressure, and reusing it will almost certainly lead to combustion gas leaks and premature failure of the new injector. It is a mandatory step for a lasting repair.
What happens if I don't program the new injector to the ECM?
Skipping this step will cause significant problems. Each injector has a unique trim code that tells the Engine Control Module (ECM) its precise flow characteristics. Without this code, the ECM cannot deliver the correct amount of fuel at the right time. This results in poor performance, rough running, lower fuel economy, higher emissions, and persistent fault codes.
Can I reuse the injector hold-down bolt?
Only for a limited number of times. Volvo's service information states the hold-down bolt can be reused a maximum of five times. These bolts are designed to stretch during the torqueing sequence and lose their clamping ability over time. It is critical to track the number of uses (e.g., by making a punch mark on the head) and replace the bolt after the fifth use to prevent injector sealing issues or catastrophic failure.
Conclusion
Proper Volvo D11 injector replacement is a critical investment in your vehicle's reliability and performance. By understanding the symptoms, using the correct tools, and carefully following the proper procedures, you can restore your engine's power and efficiency for thousands of miles to come.
Remember the non-negotiable steps: always replace the injector cup, adhere to the multi-step torque sequence, and program the new injector's trim codes into the ECM. Choosing high-quality parts is equally important, as the D11's injection system demands components built for durability and precision.
A job done right yields significant returns: restored power, improved fuel economy, and the peace of mind that comes from a dependable fleet. At G2 Diesel Products, we are committed to supporting the professionals who keep our country moving. We provide innovative, reliable, and readily available diesel fuel injectors to get you back on the road faster and keep you there longer.
Find high-quality Volvo diesel fuel injectors for your D11 engine