Paccar MX13 Fuel System Priming: The Ultimate Guide
Why Proper Fuel System Priming is Critical for Your PACCAR MX13
How to prime fuel system on 18 paccar mx13 is more than just a maintenance task; it's a foundational skill for anyone responsible for keeping a modern heavy-duty truck on the road. The PACCAR MX13 engine, a powerhouse in the fleets of Kenworth and Peterbilt trucks, is renowned for its efficiency and performance. However, its sophisticated high-pressure common rail (HPCR) fuel system is highly sensitive to the presence of air. When your PACCAR MX13 loses prime—whether from routine filter changes, the simple mistake of running out of fuel, or necessary fuel system repairs—getting it back online quickly and correctly can mean the difference between minimal downtime and a cascade of costly, preventable problems.
This guide provides a comprehensive, in-depth look at the correct procedure, moving beyond a simple checklist to explain the 'why' behind each step. Understanding the intricacies of this process protects your investment and ensures maximum uptime.
Quick Answer: PACCAR MX13 Fuel Priming Steps
Locate Components: Before you begin, identify the essential parts on the fuel filter module: the manual primer pump (your primary tool), the bleeder screw (for stubborn air), and the fuel blending valve (if equipped).
Set Blending Valve: If your engine has a fuel blending valve, rotate it 90° counterclockwise to the 'PRIME' position. This isolates parts of the system to make air removal more efficient.
Prime the System: This is the most critical phase. Loosen the primer pump knob and pump continuously for a full 150 seconds (2.5 minutes). This isn't just about strokes; it's about sustained effort to move fuel. After this, pause for 60 seconds to let air bubbles settle, then perform 25 additional, firm strokes to finish the job.
Start the Engine: Crank the engine for a maximum of 20 seconds per attempt. If it doesn't start, wait at least 60 seconds for the starter to cool before trying again. Patience here prevents expensive starter damage.
Final Check: Once the engine is running, return the blending valve to the 'RUN' position. Let the engine idle for at least 5 minutes to purge any remaining air and stabilize the system. Perform a thorough visual inspection for any leaks around the filters and connections.
The PACCAR MX13's fuel system operates under immense pressures, capable of reaching up to 30,000 PSI in the common rail. This is equivalent to the pressure at the bottom of the ocean. At these pressures, fuel acts as a hydraulic fluid. When air enters this meticulously engineered system, it compresses, disrupting the hydraulic integrity and preventing the injectors from receiving the precise amount of fuel needed to fire. This leads to the classic symptoms of extended cranking, rough running, or a complete no-start condition.
According to PACCAR's official service manual, improper priming can directly cause catastrophic damage to expensive components like the high-pressure fuel pump and the precision-engineered injectors. The manual specifically warns that cranking for more than 20 seconds without a start indicates a need for additional priming. Ignoring this can lead to the fuel pump running dry, causing internal damage and triggering a host of fault codes that can be difficult to diagnose.
As one veteran mechanic bluntly stated in a popular trucking forum: "Priming the Paccar MX13 can be worse than a 2-stroke Detroit if you don't respect the process. You can't bully it; you have to follow the steps. Every single one." This sentiment highlights why a deep understanding of the correct procedure is not just best practice—it's essential for modern fleet operations.
Understanding When and Why to Prime Your PACCAR MX13
Understanding the specific situations that necessitate priming a PACCAR MX13 can save hours of diagnostic frustration and prevent unnecessary component wear. The procedure is required whenever the fuel system's sealed, pressurized environment is compromised, allowing air to enter. Here are the most common scenarios in greater detail.
Fuel filter replacement is, by far, the most frequent reason for needing to prime the system. The MX13 engine typically has at least two filters: a primary filter/water separator and a secondary fine-particle filter located on the engine's fuel module. Whenever these filters are changed, the system is opened, and air inevitably floods the lines and filter housings. Even a small amount of air introduced during this routine maintenance is enough to prevent the engine from starting.
Running out of fuel is another all-too-common cause. When the tank runs dry, the fuel pump doesn't just stop moving fuel; it starts pulling air. This air fills the entire fuel system, from the tank pickup tube, through the lines, the filters, the low-pressure pump, and all the way to the high-pressure pump. This is often the most difficult scenario to recover from, as it introduces the maximum possible volume of air into the system, requiring a very thorough priming procedure.
Any fuel system repairs will also require priming. This includes a wide range of jobs, such as replacing a fuel line, servicing the fuel cooler, replacing a faulty injector, or changing out the high-pressure fuel pump. Any time a fitting is loosened or a component is removed, the integrity of the fuel system is broken, and priming becomes a mandatory final step of the repair process.
So, how do you know for sure when your MX13 has lost its prime? The symptoms are distinct and directly related to fuel starvation.
Extended cranking: This is the number one symptom. The engine will turn over and over, but it won't fire, or it may try to fire intermittently. The starter is working, but the injectors aren't getting the high-pressure fuel they need to operate.
Engine sputtering and stalling: The engine might catch and start briefly, run very rough for a few seconds, and then stall. This happens when small pockets of fuel are delivered, but they are followed by air bubbles, leading to inconsistent combustion.
Complete no-start condition: In severe cases, particularly after running out of fuel, the engine will crank without any hint of firing. The system is so full of air that no fuel is reaching the combustion chambers.
The consequences of ignoring proper priming, or attempting to 'force' the engine to start by excessive cranking, can be severe and costly. Air in the system leads to a destructive phenomenon called cavitation. Inside the high-pressure pump and injectors, tiny air bubbles are subjected to rapid and extreme pressure changes. They collapse violently, creating micro-shockwaves that are powerful enough to erode and pit the hardened metal surfaces of these precision components. These parts rely on the constant flow of diesel fuel not just for operation, but for lubrication and cooling.
When air disrupts this flow, the delicate internal parts of the pump and injectors can overheat, score, and wear out prematurely. This can lead to thousands of dollars in repairs for injector damage and high-pressure pump failure. As one experienced mechanic aptly put it, "Cranking an unprimed engine is like asking your fuel system to run on hope instead of diesel. Hope doesn't lubricate very well." Mastering how to prime fuel system on 18 paccar mx13 is a small investment of time that prevents catastrophic, wallet-draining repairs down the road.
For a deeper dive into your truck's fuel system components and how they work together, check out our comprehensive guide: More info about Paccar Fuel Systems.
Essential Tools and Safety Precautions
Successfully priming the PACCAR MX13 fuel system isn't just about knowing the steps; it's about being properly prepared with the right tools and a steadfast commitment to safety. This is a job that involves flammable liquids and a high-pressure system, so cutting corners is not an option.

Required Tools and Supplies
Before you even touch the engine, gather your arsenal. Having everything within arm's reach makes the process smoother and safer.
Personal Protective Equipment (PPE): This is non-negotiable. You'll need safety glasses or goggles to protect your eyes from unexpected fuel splashes. You'll also need fuel-resistant gloves (nitrile or neoprene) to prevent diesel fuel from contacting your skin, which can cause irritation and dermatitis.
Containment and Cleanup: Keep a supply of clean, lint-free rags and a suitably sized drain pan on hand. Spills are possible, and you want to be ready to contain them immediately.
Wrenches and Sockets: You will need a dedicated filter wrench designed for PACCAR's cartridge-style filters. For the fuel filter module cap, a 32mm socket with a ratchet is required.
Torque Wrench: This is a critical tool, not an optional one. The fuel filter cap must be tightened to the precise specification of 30 lb-ft (40 N·m). Over-tightening can crack the plastic housing, leading to leaks and costly replacement. Under-tightening will also cause leaks. Precision is key.
Clean Diesel Fuel: Have at least a gallon of fresh, clean diesel fuel in a clean container. This is used for pre-filling new filters and lubricating O-rings and seals.
Optional but Highly Recommended: A Mity-Vac fuel priming kit or a similar hand-operated vacuum pump. PACCAR service literature often recommends these tools for systems that are particularly stubborn or completely dry. They can pull fuel through the system much more effectively than the manual primer alone, saving significant time and effort.
Critical Safety Precautions
Safety protects both you and the multi-thousand-dollar engine you're working on. Adhere to these rules without exception.
Disconnect the Battery: Before starting any work on the fuel system, always disconnect the negative battery cable. This eliminates any risk of the engine accidentally cranking or starting while you are working.
Ensure Proper Ventilation: Work in a well-ventilated area, preferably outdoors or in a bay with a robust exhaust extraction system. Diesel fumes contain harmful volatile organic compounds (VOCs) that should not be inhaled.
No Ignition Sources: Enforce a strict no smoking, no open flames, and no sparks policy in the work area. Diesel fuel is flammable, and its vapor can ignite.
Cool Down the Engine: Never work on a hot engine. Let the engine cool down completely before you begin. Fuel system components can become extremely hot and cause severe burns. Hot fuel is also more volatile.
Relieve System Pressure: Before disconnecting any fuel lines (if your repair requires it), ensure any residual pressure in the system is safely relieved. While the low-pressure side has minimal pressure when off, it's a good habit to practice.
Wear Your PPE: We'll say it again. Your safety glasses and gloves are your first and last line of defense. A splash of diesel in the eye is a serious medical issue. Taking these simple safety shortcuts can lead to painful injuries and costly mistakes.
The Official Guide on How to Prime Fuel System on 18 Paccar MX13
This section provides the definitive, step-by-step process for priming the PACCAR MX13 fuel system. This procedure is a synthesis of official PACCAR recommendations and proven field experience from seasoned mechanics. Following these steps meticulously will ensure a successful, leak-free start while protecting the engine's sensitive components.
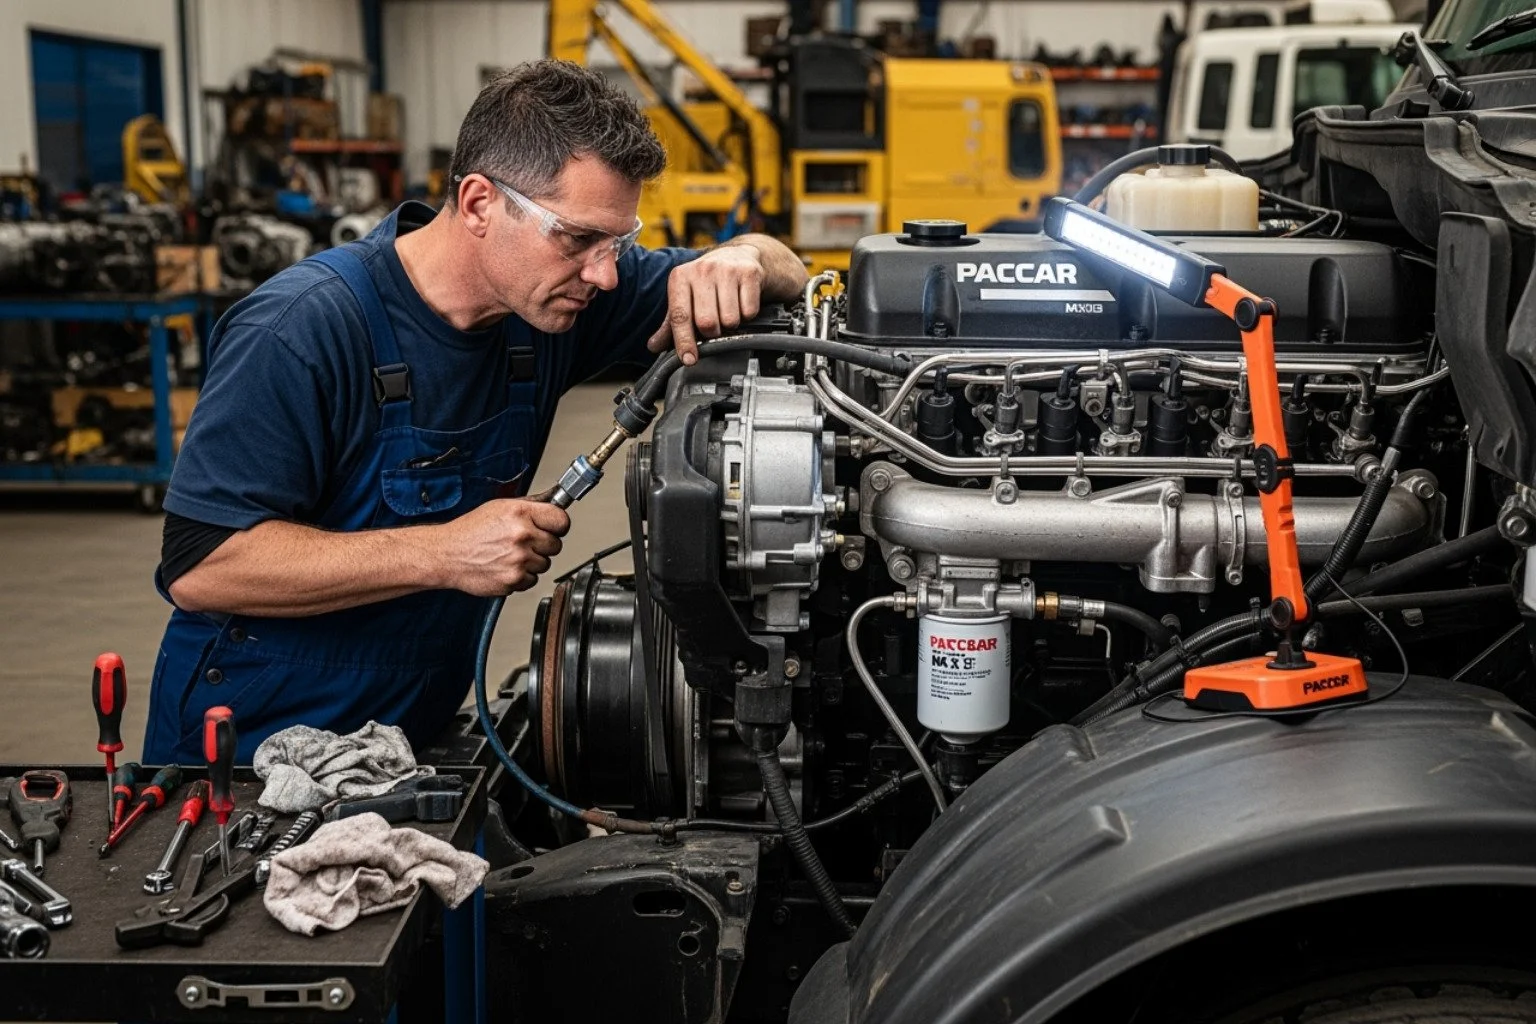
Step 1: Locate Key Components
Before you begin pumping, take a moment to become a cartographer of your engine's fuel module. Knowing the exact location and function of each part will make the process intuitive and error-free.
The Manual Primer Pump: This is your primary tool. It's a black, round knob, typically located on the top or side of the fuel filter module. It's designed to be unscrewed slightly and then pumped up and down to manually draw fuel from the tanks and push it through the filters.
The Bleeder Screw: Not all MX13 models have an easily accessible bleeder screw, but if yours does, it's a valuable asset. It's usually a small screw or bolt located at a high point on the filter module. Its purpose is to provide a direct exit for trapped air, which is especially useful when the system is completely dry.
The Fuel Blending Valve (if equipped): This is a small lever or knob, often marked with 'RUN' and 'PRIME' positions. Its main job is to regulate fuel temperature by blending warm return fuel with cool fuel from the tank. However, in the 'PRIME' position, it strategically alters fuel pathways to make it easier to purge air from the filter module. If your engine has one, using it is a critical step.
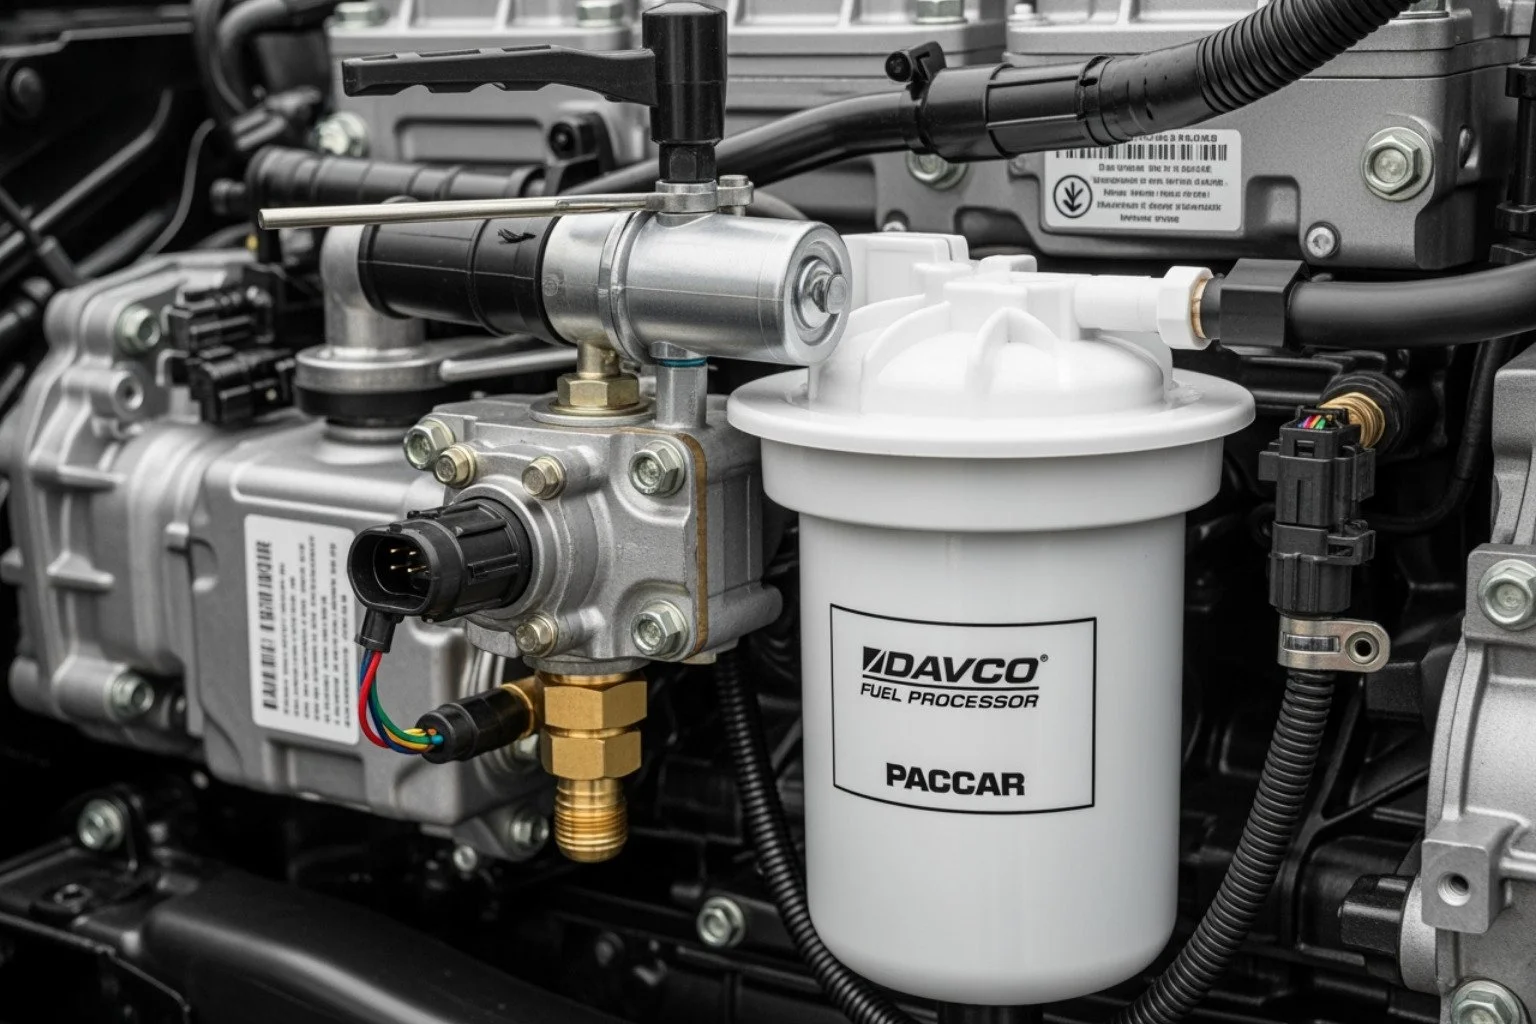
The Fuel Filter Module: This entire assembly, usually mounted on the driver's side of the engine block, is your primary work area. It houses the filters, the primer pump, and often the Engine Control Module (ECM). For a clearer picture of how everything connects, take a look at our Paccar MX13 Fuel System Diagram – it's like having a roadmap for your engine.
Step 2: The Manual Priming Procedure for an 18 Paccar MX13
This is the heart of the operation. Precision and patience are your allies. Do not rush these steps.
Prepare New Filters: This is a crucial preparatory step. Pre-fill any new fuel filters with fresh, clean diesel fuel before installation. Fill them slowly to allow the media to saturate. This single action dramatically reduces the amount of air you'll need to pump out later. Also, take a moment to lubricate the new O-rings and seals with a light film of clean diesel. This ensures they seat correctly and create a perfect, leak-proof seal.
Install and Torque Filters: When installing the new filters, tighten the filter cap to exactly 30 lb-ft (40 N·m) using your torque wrench. This is not a 'good-and-tight' situation. The precise torque ensures the O-ring is compressed correctly without damaging the housing.
Position the Blending Valve: If your engine is equipped with a fuel blending valve, rotate it 90° counterclockwise to the 'PRIME' position. This is a vital step that makes the manual pump's job much easier.
The Pumping Sequence: This is the most labor-intensive part. Loosen the primer pump knob by turning it counterclockwise a few turns until it pops up. Now, begin pumping with full, steady strokes. Pump continuously for a full 150 seconds (2.5 minutes). It's important to maintain a consistent rhythm. As you pump, you should feel the resistance gradually increase as fuel displaces the air. During this time, glance at the filter cap and seals to check for any fuel seepage; if you see any, stop and re-check your torque.
The Rest and Final Push: After the initial 150 seconds of pumping, stop and wait for 60 seconds. This critical pause allows the turbulent fuel to settle, letting smaller air bubbles consolidate at the top of the filter housing. After the wait, perform 25 additional, firm strokes. This final push helps to force the consolidated air pockets out of the module and toward the return line.
Secure and Reset: Once the pumping sequence is complete, tighten the primer pump knob by pushing it down and turning it clockwise until it's snug. Don't overtighten it. Finally, return the blending valve to the 'RUN' position by rotating it 90° clockwise. The system is now ready for an engine start attempt.
For those who prefer visual learning, PACCAR has an excellent resource where you can Watch a PACCAR priming demonstration that shows these steps in action.
Step 3: Starting the Engine and Post-Priming Checks
With the system primed, the final phase is to start the engine and verify your work.
Crank with Care: Turn the key to start the engine, but do not crank for more than 20 seconds at a time. The starter motor generates immense heat and is not designed for continuous operation. Exceeding this limit can overheat the starter and trigger protective thermal lockouts, or worse, cause permanent damage.
Cool Down is Mandatory: If the engine doesn't fire up within that 20-second window, turn the key off. Allow the starter to cool down for at least 60 seconds, though 2-3 minutes is even better. This cooldown period is essential for the longevity of the starter.
Repeat if Necessary: If the engine still won't start after a few attempts with proper cooldown intervals, it means there is still significant air in the system. Do not continue cranking. Return to Step 2 and repeat the entire priming procedure. A completely dry system can be stubborn and may require two full priming cycles.
Idle and Inspect: Once the engine starts, it may run slightly rough for a few seconds as the last bits of air are purged. Let it idle for a minimum of 5 minutes. This allows the fuel to circulate completely, stabilize pressure, and work out any remaining micro-bubbles.
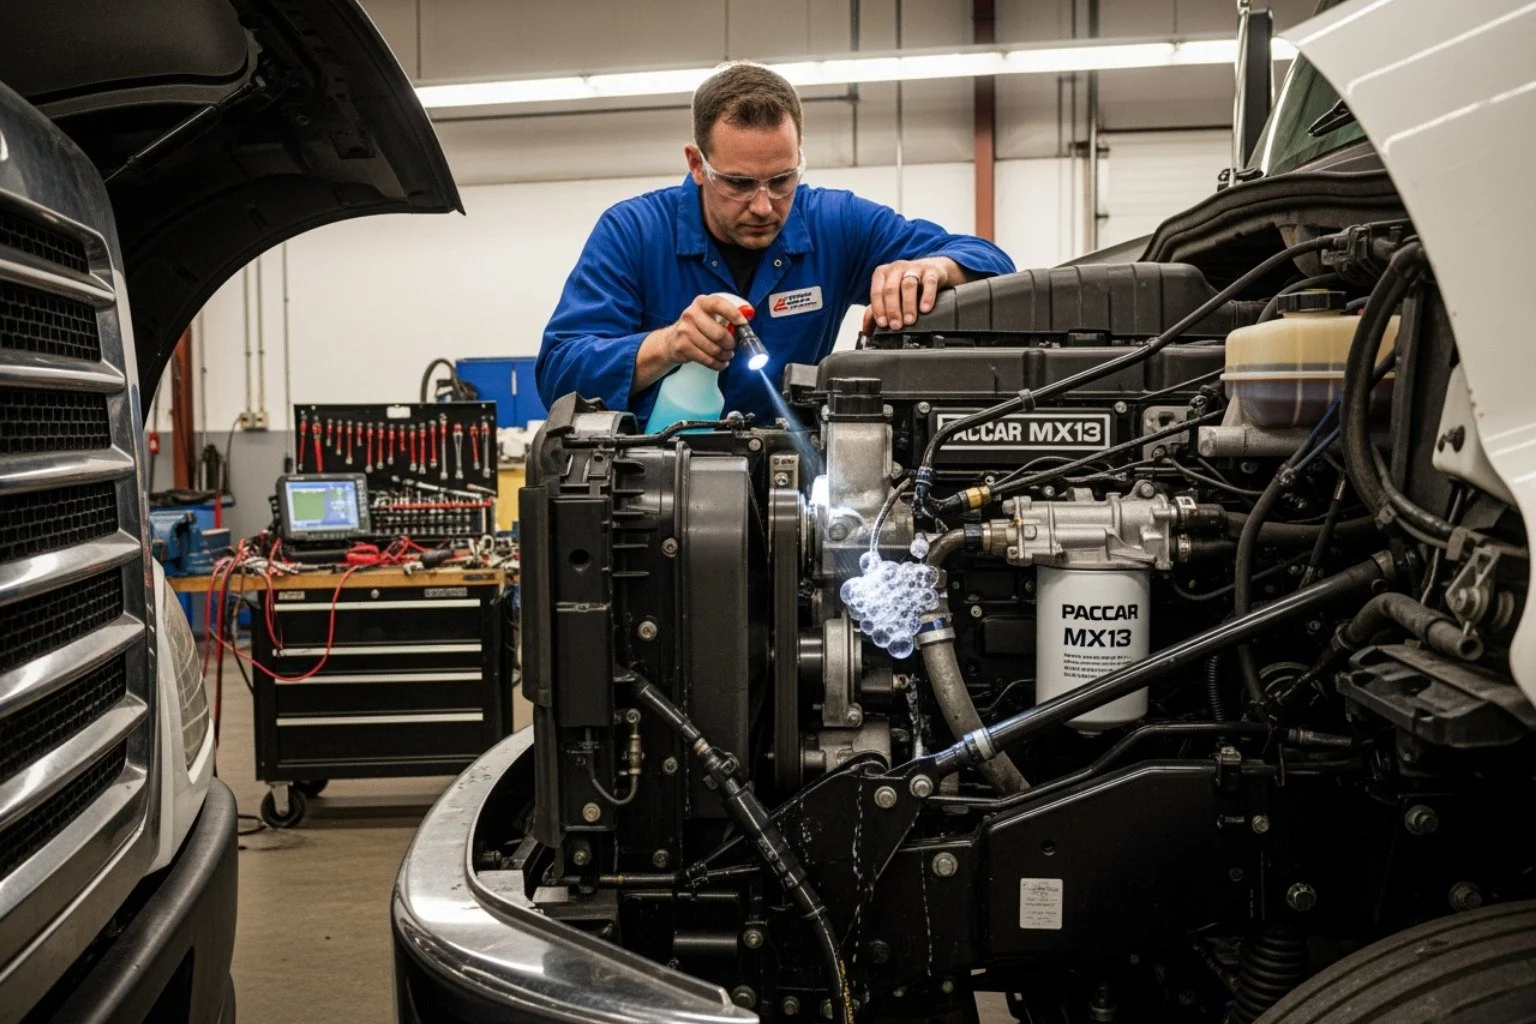
The Final Leak Check: During the 5-minute idle period, perform a meticulous visual inspection. Use a good flashlight and check for any signs of leaks around the fuel filter cap, seals, lines, and any fittings you may have touched. Check again after you shut the engine off, as pressure changes can sometimes reveal a leak.
If the engine starts readily, idles smoothly, and there are absolutely no leaks, you have successfully and professionally mastered how to prime fuel system on 18 paccar mx13.
Troubleshooting Common Priming Problems
Even when you follow the procedure perfectly, a stubborn PACCAR MX13 can sometimes refuse to cooperate. If your engine won't start or runs poorly after priming, it's time to put on your detective hat. Here are some common problems and a systematic approach to solving them.
Problem: Engine Won't Start After Priming
This is the most common frustration. The cause is almost always remaining air in the system.
Solution 1: Repeat the Procedure. The first and simplest step is to repeat the entire priming procedure from start to finish. A system that was run completely dry often requires more than one cycle to purge all the air. Be even more meticulous the second time around.
Solution 2: Check Your Seals. An improperly seated or damaged O-ring on the fuel filter cap is a primary culprit for allowing air to be sucked back into the system as you prime. Carefully remove the filter cap, inspect the O-ring for any pinches, cuts, or twists. Re-lubricate it with clean diesel fuel and reinstall it, paying close attention to the 30 lb-ft torque specification.
Solution 3: Look for Obvious Leaks. A visible fuel leak is also a guaranteed air leak. Thoroughly inspect all fuel lines, fittings, and the filter housing itself for any signs of wetness or dripping fuel. A leak on the suction side of the system (from the tank to the pump) will draw in air instead of leaking fuel, making it harder to spot.
Problem: Engine Starts, Then Stalls or Repeatedly Loses Prime
If the engine fires up but then dies, or if it runs fine but then won't restart after being shut off for a while, you have a persistent air leak somewhere in the system.
Inspect Suction-Side Fuel Lines: The lines running from the fuel tank to the engine are under vacuum, not pressure. This means a crack or loose fitting won't leak fuel outward but will suck air inward. Carefully inspect these lines for hairline cracks, chafing, or loose connections, especially at the fittings on the tank and at the fuel module.
Check the Primer Pump Check Valve: The manual primer pump has an internal check valve to prevent fuel from draining back to the tank. If this valve is faulty, the system can lose its prime over time. If the primer pump offers little resistance even after extensive pumping, or if the engine loses prime after sitting, the pump itself may need to be replaced.
Examine the Fuel Tank Pickup Tube: A crack in the pickup tube inside the fuel tank can draw in air, especially when the fuel level is below the crack. This can be a frustrating issue to diagnose, often manifesting as a problem only when the tank is less than half full.
Consider Other Components: Check for less common issues like clogged fuel tank vents, which can create a vacuum in the tank that the pump can't overcome. Also, inspect the fuel heater (if equipped) as a cracked housing can be a source of air intrusion.
Advanced and Alternative Priming Methods
For truly stubborn cases, you may need to escalate your tactics.
Using a Vacuum Pump (Recommended Method): A vacuum pump like a Mity-Vac is the professional's choice. Connect the pump to the fuel return line or a designated test port on the fuel module. By pulling a vacuum, you can draw fuel through the entire system, effectively pulling out trapped air. This is often faster and more thorough than manual pumping. Follow the vacuum pump manufacturer's instructions carefully.
Low-Pressure Air (Use Extreme Caution): This method involves applying very low air pressure (a maximum of 3-5 PSI) to one of the fuel tanks to push fuel through the system. This technique is potentially dangerous and should be used as a last resort by experienced technicians only. You must seal the vents on the tank you are pressurizing and open the cap on the other tank (if it's a dual-tank system). Exceeding 5 PSI can damage the fuel tank, sending unit, or lines. It is far safer to use a vacuum pump.
Using the Bleeder Screw: If your system has a bleeder screw, use it. Have a rag ready to catch fuel. Loosen the screw slightly and begin operating the manual primer pump. You will hear air hissing out. Continue pumping until a solid, bubble-free stream of fuel emerges, then tighten the screw while still applying pressure with the pump.
For more hands-on advice and real-world scenarios from mechanics who've fought these same battles, check out these real-world troubleshooting tips from the trucking community.
Frequently Asked Questions about PACCAR MX13 Fuel Priming
Here are detailed answers to some of the most frequently asked questions about how to prime fuel system on 18 paccar mx13 engines. Clearing up these common points of confusion can make the process smoother and safer.
How do I know if the fuel system is properly primed?
A properly primed system gives several clear, unmistakable indicators. First, the manual primer pump will feel firm and offer significant resistance on the downstroke, indicating it's moving solid fuel, not compressible air. Second, when you go to start the engine, it should fire up quickly and decisively, typically within 5-10 seconds of cranking, without excessive hesitation. Third, once running, the engine should settle into a smooth, steady idle with no sputtering, surging, or shaking. Finally, a thorough visual inspection should confirm there are absolutely no fuel leaks from any of the components you've touched.
What is the role of the bleeder screw when I prime the fuel system on an 18 Paccar MX13?
The bleeder screw is a valuable tool for purging large, stubborn air pockets that the standard priming procedure might struggle to clear. While the MX13 system is largely designed to be self-bleeding (purging air through the return lines), the screw provides a direct and immediate escape route for trapped air. It's most useful after running a truck completely out of fuel or after replacing major components. To use it, you simply loosen the screw a turn or two, operate the manual primer pump, and watch for air and fuel to escape. Pump until a solid, steady stream of clean fuel emerges without any visible air bubbles, then immediately tighten the screw to seal the system.
Can I use starting fluid (ether) to start an unprimed MX13?
Absolutely not. Using starting fluid on a modern high-pressure common rail (HPCR) engine like the PACCAR MX13 is extremely dangerous and can cause catastrophic engine damage. HPCR engines are not designed for it. The uncontrolled, explosive combustion of ether can create cylinder pressures far beyond the engine's design limits, potentially leading to cracked pistons, bent connecting rods, or other severe internal damage. Furthermore, it does nothing to solve the root problem, which is a lack of fuel for lubrication in the high-pressure pump and injectors. Forcing the engine to run on ether will cause these components to run dry, leading to premature failure. Always solve the priming issue correctly.
Why is pre-filling the fuel filters so important?
While some mechanics debate this practice on older systems, pre-filling the filters on a sensitive HPCR system like the MX13 is a critical step. A new, dry fuel filter can hold a significant amount of air. By pre-filling it with clean diesel, you are displacing the vast majority of that air before you even begin the manual priming process. This dramatically reduces the amount of time and effort required to pump, lessens the chance of air pockets getting trapped downstream, and ultimately leads to a faster, more reliable start. It's a simple, 2-minute step that can save you 20 minutes of frustration.
Are there differences in priming a PACCAR MX13 vs a PX-9?
Yes, there are significant differences, and assuming the procedures are the same is a common mistake. While the basic principle of removing air is universal, the specific components, their locations, and the prescribed procedures vary. The MX13 has its characteristic integrated fuel filter module with a specific primer and blending valve system. The PX-9, on the other hand, has a different filter setup, often a spin-on filter with a different style of priming pump. Specifics like pumping times, the presence or absence of a bleeder screw, filter configurations, and valve operation differ between the two engine platforms. Always refer to the specific service manual for the exact engine model and year you are working on. Do not substitute one procedure for the other.
If you're dealing with a PX-9, we've got you covered with our detailed guide on How to Prime a Paccar PX-9 Fuel System.
Conclusion
Mastering how to prime fuel system on 18 paccar mx13 is not just a technical repair skill; it's a critical competency for maintaining truck reliability, minimizing downtime, and protecting a significant financial investment. A truck that won't start due to a loss of prime is a non-earning asset. This guide has walked you through the entire process in detail, from understanding why priming is necessary to troubleshooting the most stubborn systems.
The key takeaway is that success lies in precision and patience. The proper priming procedure—following the 150-second pump, 60-second wait, and 25-stroke final push—is a proven method that reliably gets your truck running while safeguarding thousands of dollars in precision fuel system components. There are no shortcuts to this process; every step is there for a reason.
Safety must always be the top priority. The combination of flammable fuel, high-pressure systems, and heavy machinery demands respect. Always work in a well-ventilated area, disconnect the battery to prevent accidental starts, and eliminate all potential ignition sources. Adhering to these safety protocols protects you from injury and your equipment from expensive, avoidable damage.
Ultimately, correctly priming the fuel system is a fundamental aspect of preventing costly damage to your high-pressure fuel pump and injectors. These components are the heart of the MX13's performance and efficiency. They rely on a constant, air-free flow of diesel fuel for lubrication and cooling. Allowing them to run dry, even for a short period, invites the destructive forces of cavitation and premature wear.
Your fuel pump protection strategy begins with excellent maintenance practices, and proper priming is at the top of that list. Following PACCAR's recommended procedures is a direct investment in the longevity and performance of critical components like Smart F2P Injectors, which are engineered to deliver optimal performance and durability when cared for properly.
At G2 Diesel Products, we've built our reputation on a deep understanding of what keeps PACCAR engines performing at their peak. Our expertise goes beyond manufacturing world-class replacement parts; we are committed to empowering technicians and fleet managers with the knowledge to maintain their equipment correctly. When the time does come for replacement components, you can be confident that our commitment to quality engineering and manufacturing excellence matches your dedication to proper maintenance.
For top-quality replacement parts that meet or exceed OEM specifications for your PACCAR engine, explore our full selection of PACCAR diesel fuel injectors. Because when you've mastered the right procedures, you deserve components that are engineered to the same high standards.